How to Validate Studies
This article will guide you through the process of validating studies. Before you begin, we recommend that you have a basic understanding of Study Validation.
Manual Study Validation Page
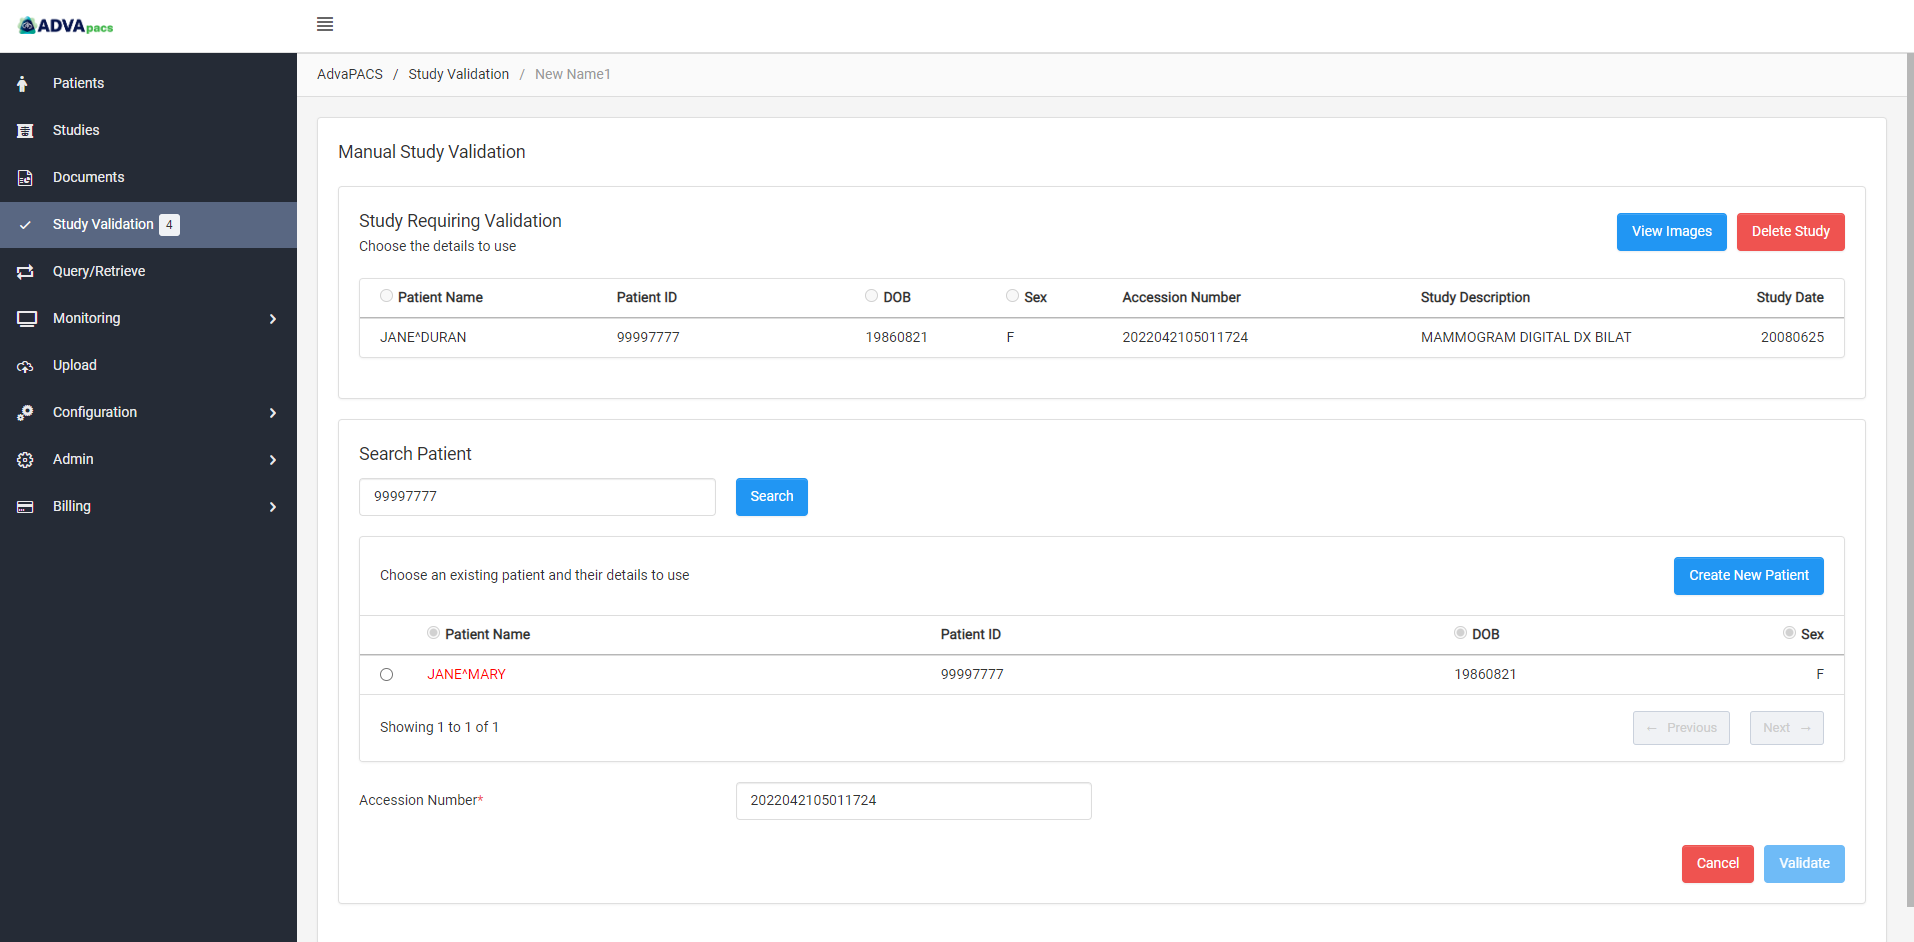
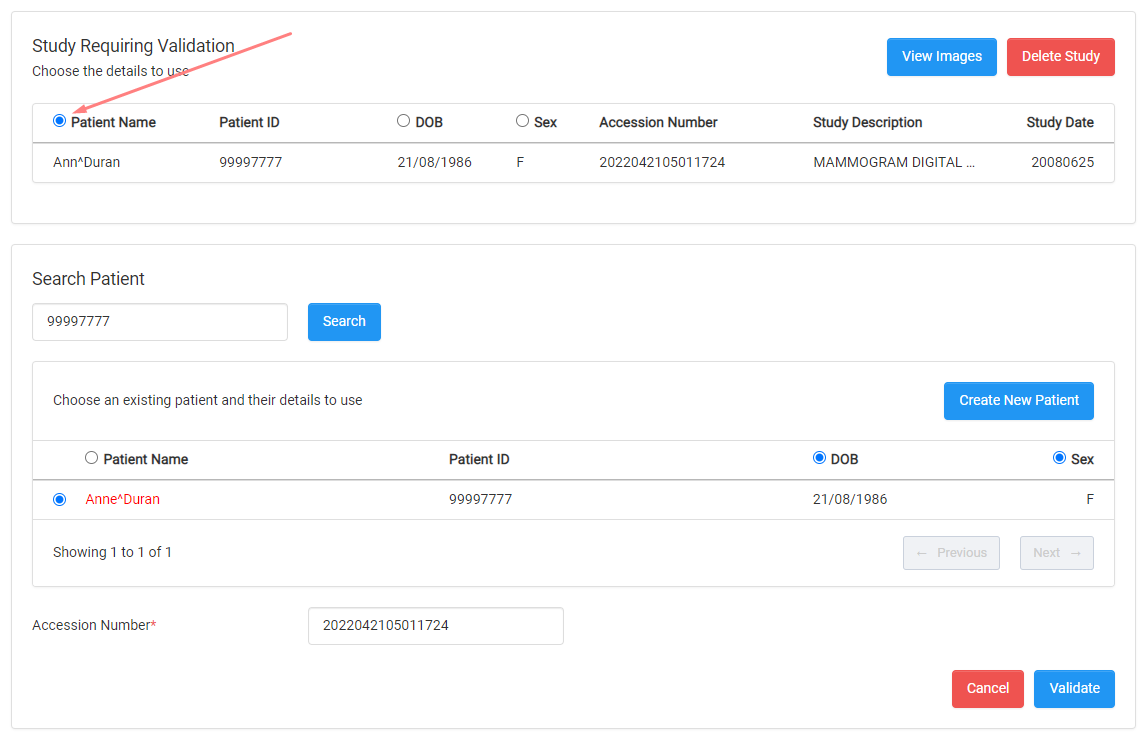
The study that requires validation is shown at the top of the Manual Study Validation page. The Search Patient section below it allows you to search for and select existing patient records to compare with and validate the study, update the study's accession number, or create a new patient record.
Manual Validation Process
The manual validation procedure begins by checking the study requiring validation for an existing patient record. After determining whether or not an existing record exists, the study is validated based on the applicable validation approach.
Checking for an existing patient record
Checking a study for an existing patient record is a prerequisite to validating a study because it allows us to make an informed decision about which validation approach to take, whether we want to avoid duplicate records or simply create a new patient record to replace an old one. Therefore, skipping this step could potentially result in the creation of another patient record for an already existing patient record.
By incorporating this process before validating a study, we can first get a sense of the current state of the patient's data in the system before making any changes to them.
Steps
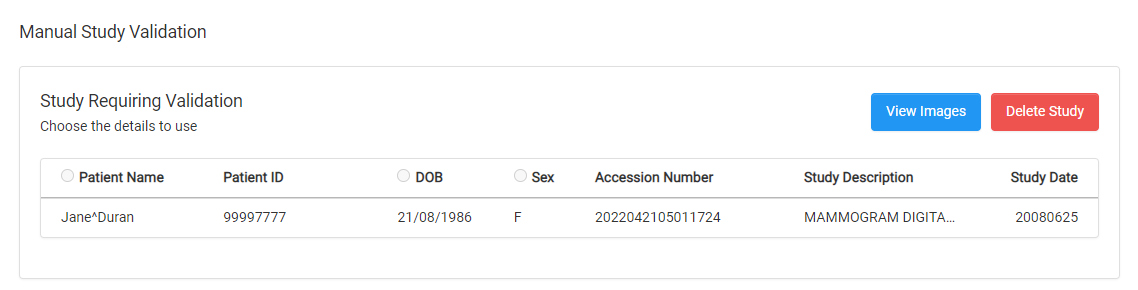
To check for an existing patient record, we'll use this study requiring validation as an example.
-
Enter the patient's ID in the Search Patient section below it, and click Search.
-
The search result may either return an existing patient record or none. In this example, it shows that there is an existing patient record.

-
Once you have the result you may now use this information to decide what validation approach to use and proceed in validating the study.
Validating Studies
To validate a study, there three different approaches to choose from:
- Creating a new patient record
- Choosing an existing patient and selecting patient details
- Generating or updating an Accession Number
Before you proceed, make sure that you have already checked the study for an existing patient record. Doing so will help you choose the correct validation approach.
Take note that your validation approach may vary depending on your case. If you're unsure on how to validate studies in different contexts, you can check the Scenarios section and follow the steps that suits your specific case.
Creating a new patient record
If the study requiring validation does not have an existing patient record and it has missing or incorrect patient details, you can use this approach to create a new patient record and fill-in the correct details.
-
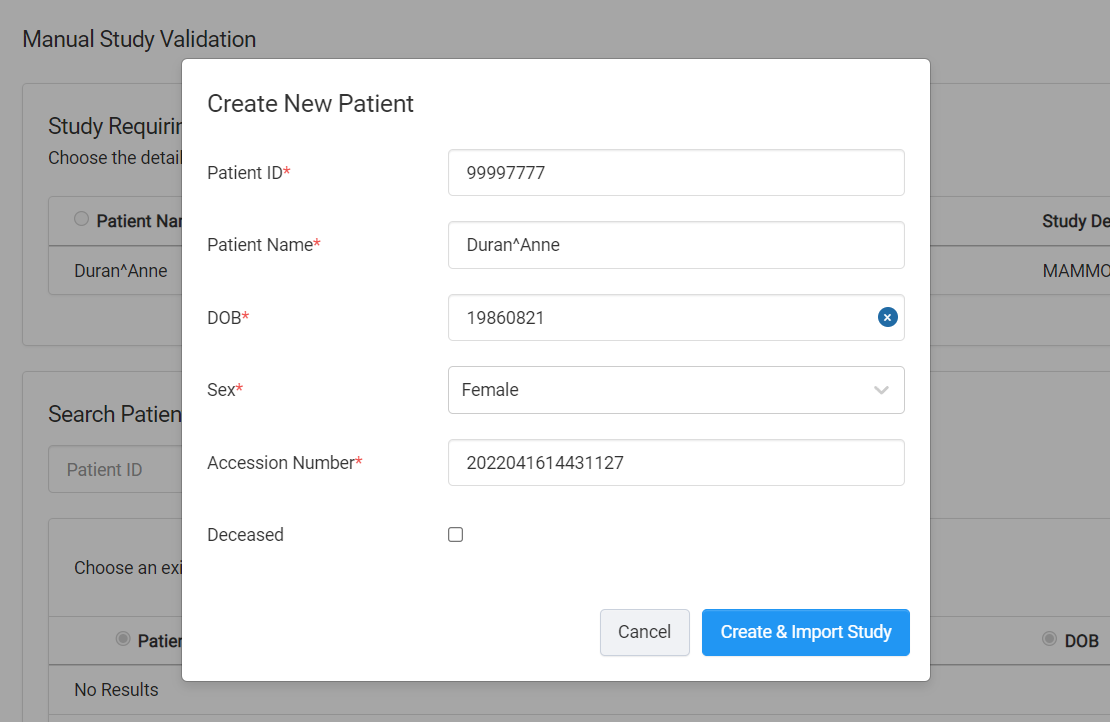
To create a new patient record, click on the Create New Patient button.

-
Fill-in the appropriate patient details.
-
Click the Create & Import Study button to create a patient record for the study and save it in the system.
Choosing an existing patient and selecting patient details
If the study requiring validation has an existing patient record in the system with one or more details that do not match the study's details, you can use this approach to choose which detail or details the study can use.
-
To choose an existing patient record, search for the patient using its Patient ID in the Search Patient section. If the study has a Patient ID, the system will automatically search for it.

-
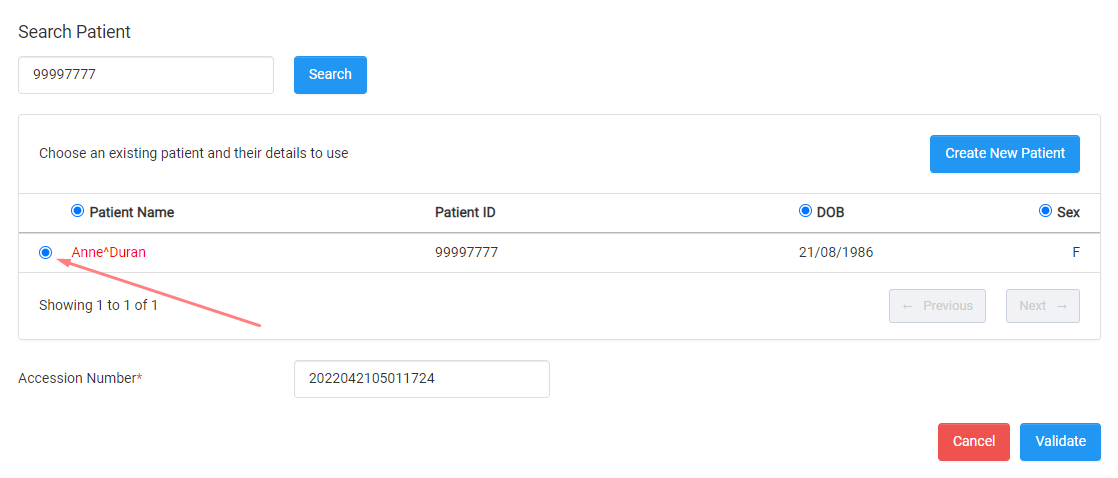
Choose the relevant patient record, if applicable.
-
After selecting an existing patient record to associate the study with, if there are missing or mismatched details between the study's patient record and the existing one, they will be highlighted in red.
The radio buttons beside the Patient Name, DOB, and Sex allows you to update the existing patient record by selecting the appropriate patient details from either of the two records.
In this example, if the correct spelling for the patient is the one above, select it.
Generating or updating an Accession Number
If the study requiring validation does not have an Accession Number or if it is incorrect, you can use this approach to generate a new one or update the existing number.
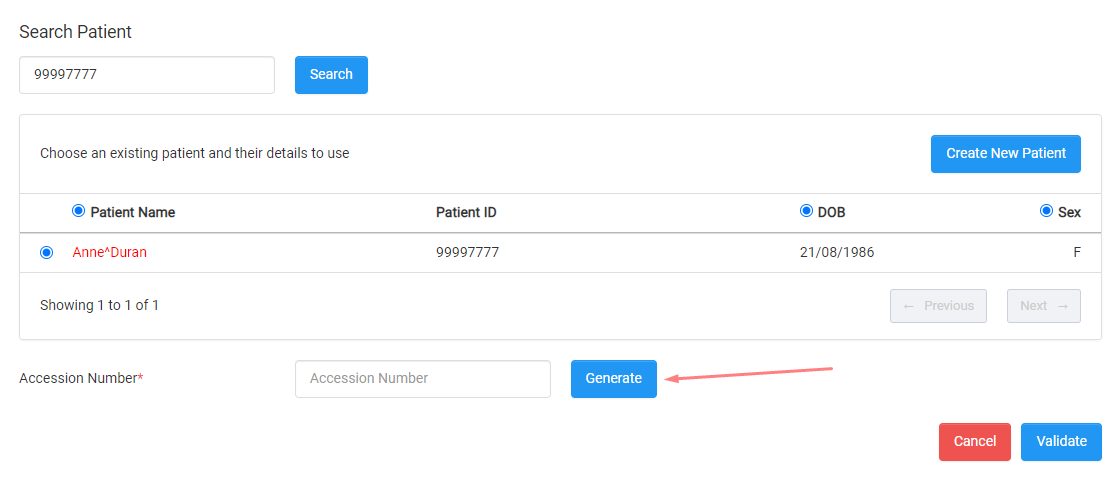
Generating an Accession Number
-
Clear the Accession Number input field, and a Generate button should appear.
-
Click on Generate.
-
If you're satisfied with the new Accession Number, click Validate.
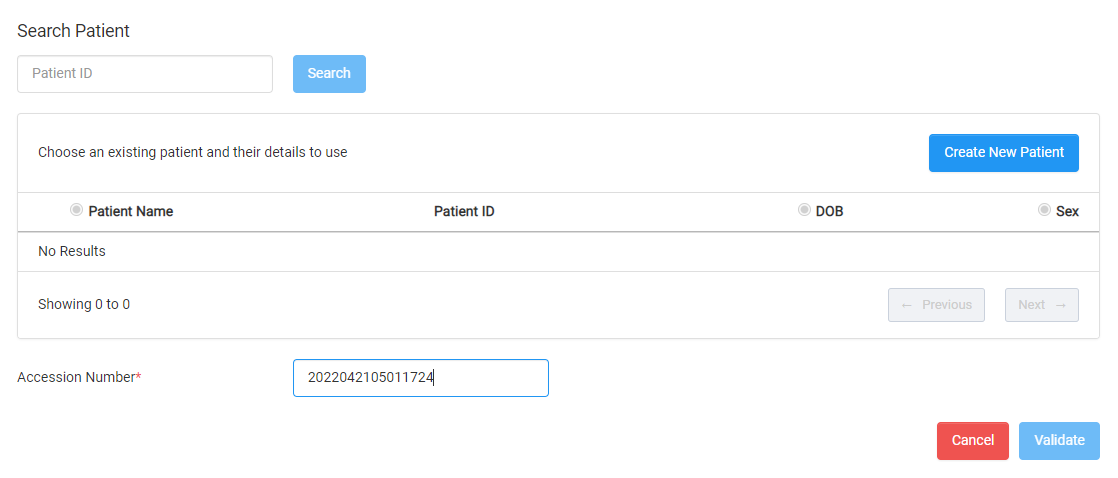
Updating an Accession Number
-
Click on the Accession Number input field.
-
Modify the number.
-
Click Validate.
Depending on some optional features you may have enabled like Organisations or Assigning Authorities, there may also be other details that come with the studies that you can also select.
Scenarios
The examples below shows how the validation approaches are used in different cases.
Before following the steps here, make sure that the study you're validating has already been checked whether it has an existing patient record or not.
Study has a Missing Patient ID
-
Follow the relevant instruction below that applies to your finding:
- No existing patient record
- If there's no existing patient record found, you can create a new patient record and manually add a Patient ID.
- Has an existing patient record
- If there's an existing patient record, choose the existing patient and select its Patient ID.
- No existing patient record
-
Click Validate to validate the study.
Study has a Patient ID and Issuer
-
Follow the relevant instruction below that applies to your finding:
- No existing patient record
- If there's no existing patient record found, you can create a new patient record.
- Has an existing patient record
- If there's an existing patient record, choose the existing patient.
- No existing patient record
-
Click Validate to validate the study.
Study has a Patient ID and Issuer, but the Name, Gender, or DOB is mismatched
-
Follow the relevant instruction below that applies to your finding:
- No existing patient record
- If there's no existing patient record found, you can create a new patient record.
- Has an existing patient record
- If there's an existing patient record, the mismatching details are highlighted in red. Choose the existing patient and select the correct patient details.
- No existing patient record
-
Click Validate to validate the study.
Study has a Patient ID and Issuer, but no Accession Number
-
Follow the relevant instruction below that applies to your finding:
- No existing patient record
- If there's no existing patient record found, you can create a new patient record.
- Has an existing patient record
- If there's an existing patient record, choose the existing patient and generate or manually set an Accession Number.
- No existing patient record